How to Make a Homemade Vaporizer with these Easy Instructions

Let's get started

The toughest part of making a homemade vaporizer is tracking down the parts. I have spent many hours in an attempt to compile a list of everything required and link to find the stuff but it is difficult to find everything. For now you can see the picture I had made of the homemade vaporizer and improvise the best you can.

Now your first step is to pick up the supplies I have listed. Here is where you might have to improvise. For example you don't have to have a glass jar that is exactly round like the one in the picture.
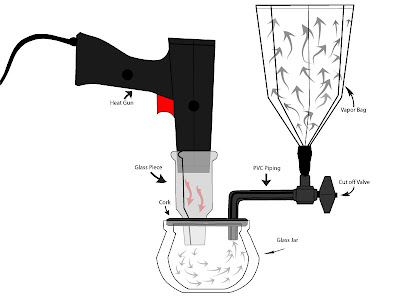

homemade vaporizer
My hope is you will understand the general concept of the design and be able to put your own spin on it. This homemade vaporizer design requires very little assembly. Once you have gathered the materials I have listed than you are approximately 90% done.

The hardest thing to find in this equation is the glass jar or bowl. The first homemade vaporizer that I encountered had a huge fishbowl-like glass jar with a cork fitting on the top. It was absolutely perfect. There was a straight glass tube that belled in the middle fitted perfectly for the heat gun.

Luckily the owner of the vaporizer knew a glass blower but you might not be so fortunate. It would be nice to find a glass blower for this but this is not always possible so I have figured out an easier and cheaper alternative. You can use a vaporizer bowl attachment instead, and make sure you get the one with the long stem.

The Homemade Vaporizer Supplies


  • 1 Heat Gun with free Bowl
  • A huge glass jar about 10" inches in diamater with a cork top
  • 1 large clear plastic bag of your choice preferably something durable
  • 1 90 degree pvc elbow and pvc on/off valve connector
  • 1 glass tube with screen, or vaporizer bowl
  • Duct Tape

  • Ok...if you have all the stuff the rough part is over and you are ready to get this homemade vaporizer going. You need to put two holes in the cork lid about 2 inches apart. One will be for the glass tube or vaporizer bowl and the other for the PVC 90 degree elbow.

    When making the homemade vaporizer keep in mind that it must be air tight, so only make your holes as big as the circumference of the bowl and fitting. If you happen to make the holes too big don't panic, because you can wrap some duct tape around the pieces to make them fit nice and snug.


    bag of thc vapor
    Now we need to make sure the on/off valve fits tightly also, and is able to be connected and disconnected with ease for your vaporizer sessions. You can get creative and set this up however you would like as long as you know it needs to remain open while filling and open/close for operation.

    The last step is to attach the bag with duct tape or a hose clamp and you are good to go.

    Congratulations, it's time to test your homemade vaporizer

    Let the Testing Begin!!!


    Read more...

    Choosing the Right Homemade Vaporizer Heat Gun

    !!Before you buy a heat gun read this first!!

    There are many different vaporizer heat guns on the market to choose from, with a wide range of prices. I have found the perfect heat gun for your homemade vaporizer and and it comes with a bowl for $99 so check it out at the bottom of this post. If you have already found a heat gun than there are a few requirements that you must make sure the vaporizer heat gun fulfills before you purchase it.

    The most important feature for your vaporizer heat gun is that it has variable heat control. We want to be able vaporizer you herbs which will require a different vaporization temperature depending on what herbs you are using. This is why the heat guns for $19.99 won't work for your homemade vaporizer. The cheap heat guns usually only have a couple settings which will be WAY TOO HOT and will torch your herbs.

    Another thing to keep in mind when purchasing your vaporizer heat gun is to make sure that it will fit your glass piece on your homemade vaporizer. This could be catastrophic if your vaporizer is ready to rock and the heat gun doesn't fit, so you might want to track down your vaporizer heat gun before finding your glass piece. Like I said the toughest part of making a homemade vaporizer is tracking down the parts, and finding the right heat gun is crucial.

    This heat gun is perfect and comes with a free bowl >>>>

    vaporizer heat gun
    Read more...

    Using Your Homemade Vaporizer

    Now this part is easy

    So you are ready to give you homemade vaporizer a try, and if you've made it this far I'm sure you can probably figure it out yourself but I will just go over the basics. First order of business when it comes to any vaporizer(volcano or homemade) is to chop up your herbs. Now you can use a grinder for this process if you have one, but if not the best substitute is a shot glass and some small scissors.

    Now it's time to start up the heat gun, crank that baby to 360 degrees Fahrenheit and let her warm up for a minute. Blow dry your hair if need be, just give it a couple minutes and it's time to load up the herb. Ok make sure the bag is connected with the valve open and you should be ready to rip. I'm hoping within a few minutes you are realizing that making a homemade vaporizer is going to pay off quite well.

    You might be wondering if vapor gets stale like regular smoke does. The answer is NO...vapor will not get stale for at least 30 minutes which is plenty of time for you to have an enjoyable session. When I first discovered vaporizing one of the first thing that popped into my mind is that the smoke would have to get stale very quickly. What I didn't realize is that it isn't smoke in the bag it is vapor, which is a completely different.
    Read more...

    Finding the Best Vaporizer Temperature

    You have to make sure you get your heat gun rolling at the right temp

    Finding the proper vaporization temperature is kind of a process of trial and error depending on the vaporizer set up. The goal is to find the boiling point of THC, or the vaporizer temperature that works the best for you and enjoy the resulting vapor. Many people ask me what the perfect vaporization temperature is, but the answer isn't that simple.

    As a rule of thumb 370 degrees Fahrenheit is the accepted vaporization temperature. Vaporizer heat gun temperatures might vary from brand to brand so 350 degrees on one gun could be 370 degrees on another. When you embark on your quest to find the "sweet spot" or the best vaporizing temperature use 360 degrees as your starting temperature and change it up from there.

    vaporizer temperature
    This should be a pretty painless process. A little vaporizer trial and error testing, you don't have to twist anyone's arm trying to get someone to join you. THC reaching it's boiling point usually is a pretty enjoyable moment for most people, it sure is for me. Good luck on your quest to find the perfect vaporizer temperature. Please comment with information about the vaporizer heat gun or heating element you are using and the vaporization temperature that you enjoy the most.

    The plant matter you are using also plays a role in finding the temperature required for proper vaporization. You might have some herbs that are semi moist which would require a high temperature or if the herb is very dry a lower temperature is what you need. Freshness and density of the herbs is a big factor when setting your temp but remember that 350(F) degrees is the central temperature for you to work around.
    Read more...

    How do Vaporizers Work?

    Are you ready to learn how a vaporizer does what it does??

    The process of vaporizing consists of heating up your herbs with some sort of heating element instead of burning the herbs with a flame. When using a flame the amount of heat applied to the herbs is way more than needed to achieve the desired effect, it is basically overkill.

    A flame is well over 1000 degrees Fahrenheit and the required temperature to activate the chemicals in your herbs is around 300 - 400 degrees Fahrenheit, so you can imagine that not only are you inhaling unnecessary carcinogens but you are also not using your herbs efficiently. Vaporizing only gives you the effects you desire from the herbs without the negative health benefits.

    Vaporizing has become one of the favorite methods of smokers and there are many different vaps to choose from. Vaporizers differ in the way the heat is delivered to the herbs and I will give you a breif rundown on the two main vaporizer heating methods.


    Direct heat source(Conduction): The herbs are placed on a direct heat source such as a metal plate or some sort of glass surface which is than heated. Personally I feel this method is the least desirable because you run the risk of burning the herbs making the experience the exact opposite of enjoyable.


    Indirect heat source(Convection):
    With this method the herbs will never actually touch the heat source instead hot air passes through the herbs creating the desired effect without running the risk of burning the herbs. This is the ideal method for efficient smoking while keeping the health of your lungs in mind.


    When using an indirect heat source there are two method so delivering the vapor to the user through storing it in some sort of bag or container, or directly inhaling the resulting vapor. This is where preference comes into play, for me I like the stored vapor in a bag so I can take my time to enjoy it without having to use the device for every hit. You just fill the bag, sit back and enjoy.

    Make sure you clear your schedule because of how effective vaporizing is otherwise your vaporizer might clear your schedule for you. Vaporizing is ideal for medical patients that are using herbs for pain management and don't want to harm their bodies in the process.
    Read more...

    Health Benefits of Vaporizing

    If you are interested in living a healthy lifestyle than you should know that vaporizing won't damage your lungs like smoking will


    Vaporizing is hands down the cleanest and most efficient way to enjoy your herbs. Vaporization consists of heating the herbs(not burning) and blowing the resulting vapor into some sort of bag or container. The vaporization process actually saves you from all of the carcinogens in smoke by gently heating the herbs instead of torching them.


    A major difference between vapor and the smoke, is the freshness. The vapor will stay fresh for the entire smoking session and will not become stale like regular smoke would. When you use a flame to smoke you are burning carcinogens and unwanted plant matter that has ZERO effect besides damaging your lungs. After a homemade vaporizer session the herbs will be brown and and stripped of their active chemicals, you can treat it the same as ash.
    health benefits of vaporizing
    The flavor and aroma from vaporizing is a one of a kind experience that all smokers should have and those who haven't I am sure would like to. Obviously I'm an advocate of trying to make a homemade vaporizer vs buying one, and if you see how effective mine is you will feel the same way. The volcano is $600 which is a little ridiculous, let's make homemade vaporizers and hopefully they will either go out of business or drop the price. If you smoke the health benefits of vaporizing are clear but which vaporizer to choose is another tough decision. Whether it is a volcano or homemade it still beats the classic Bic lighter any day of the week.
    Read more...

    Why You Should Vaporize...

    If you smoke regularly than you might want to think about buying a vaporizer or building one. Over time smoking your herbs will damage your lungs much more than vaporizing will. You will avoid inhaling many harmful carcinogens that go along with conventional smoking.

    The pure efficiency of vaporizing is also a big selling point for many people. Using less herb while being more effective is what makes many people want to use a vaporizer. So you could say that building your own vaporizer is sort of an investment. Spending a couple hundred bucks can wind up saving you money in the long run along with your lungs. We cant all foot the bill for a volcano so we have to get resourceful, and we don't want to sacrifice the quality session that the volcano provides.

    That is where I feel that the middle of the road vaporizers just don't make the cut. They are a pain in the ass and detract from the enjoyment you should be having when vaporizing. Which is where the focus of this blog comes in, if you can't afford the volcano than don't waste your money on a a low priced Vap build your own vaporizer and save some cash.

    When your filling a massive bag of sweet vapor you'll thank me for this sweet design and so will your bank account. It can be done my friends, so have faith and soon I will update the page as I locate more parts required for making your vaporizer.
    Read more...

    Vapormatic Vaporizer : The Vapormatic Review

    vapormatic vaporizer reviewThe Vapormatic Vaporizer is a convection based vaporizer with a vintage look that can either fill a bag or be hit directly. The unit functions very well and simply with an electable disc for your herbs. After filling the unit with your favorite herbs there are two knobs to use, one controls the heat and the other controls the speed of the fan. From there my experience with the vapormatic was absolutely amazing, I have used it at least 100 times now and the vapormatic is still doing the job to the fullest.

    As you can guess by the theme of this blog I am an advocate of convection based vaporizers. Personally I have always enjoyed convection based vaporizers that fill up a bag more than any other vaporizer on the market and the Vapormatic definitely fulfills this requirement. When you relax in your smoke zone there is nothing more relaxing than a convection based vaporizer that fills a bag for you. This way you can kick back and take your time inhaling as much vapor as you want without worry.

    Another thing that I really like about the Vapormatic is the simplicity of it's design. There are no frills just pure vaporizing power. Upon first seeing the Vapormatic's retro look some people don't seem to take the Vapormatic serious. But you can take it from me, this little puppy packs the vaporizing quality of any high level vaporizer on the market. Once you realize how easy the Vapormatic is to use and how tasty the resulting vapor bags are you will start to love this little beast.

    If you are worried about the durability of the Vapormatic than think again. I have had mine for about a year now and I also have a good friend that has had one for about the same time frame. Up until this point neither one of us have had single problem with the Vapormatic vaporizer. As far as durability is concerned, the Vapormatic gets 5 stars in this area and most others.

    for those of you who don't want to build your own vaporizer than the Vapormatic is the next best choice. Its relatively low priced at only $299 and delivers the same enjoyable vapor bags of a homemade vaporizer. Whenever someone asks me for a vaporizer recommendation, the Vapormatic is always at the top of my list. Continue reading the rest of this review to find out what else the Vapormatic has to offer.

    Vapormatic Review Pros:


  • Sleek Design
  • Variable Temperature
  • Variable Speed Fan
  • Bag Inhalation
  • Direct Inhalation
  • Illuminated LCD screen

    Vapormatic Review Cons:


  • Nothing yet, this thing is bangin


    Vapormatic vaporizer perks

    The Vapormatic vaaporizer has exact digital temperature control

    Illuminated LCD screen gives you exact temperature read out within +- 4 degrees celsius

    The Vapormatic deluxe vaporizer has dual heat & fan speeds

    The Vapir Vapormatic deluxe vaporizer uses a revolutionary new quartz crystal heating element.

    The Vapormatic can be used for either direct inhilation or bag inhilation

    VaporMatic Deluxe Vaporizer Balloons now 35% Larger

    Thanks for reading my Vapormatic vaporizer review and please leave a comment with your own personal experience with the Vapormatic.

    Check out this Vapormatic vaporizer review on YouTube


    Save over 30% off the list price: $449.97 and get the

    VaporMatic for $299

    Vapormatic Read more...
  • V-tower Extreme Vaporizer Review

    V-tower Extreme is only $299 and has been getting great reviews

    Upon first look at the V-tower I feel like the thing could be a prop in a sci-fi movie. After further inspection this thing really impressed me with the extreme vap is it's functionality. The vap is multi-purpose, it can rotate from a bag filled vaporizer to a whip vaporizer by simply switching the tubes provide. One is a small tube connected to a bag and the other is a large tube that is your whip for direct inhalation.

    Another impressive thing about the v-tower is the 3 speed fan that it has. This allows you to change the density of the vapor very easily which is a nice feature to have. All of the components of this vaporizer are top quality from the ceramics used inside the unit to the food grade tubing and glass connections providing you with untainted vapor.


    Positives


  • The price is incredible $299 with more features than the volcano you can't beat it
  • All components are top quality
  • Nice LCD screen
  • Ability to switch from bag to whip
  • Comes with a remote control
  • Sleek design


    Negatives


  • None here


  • The extreme V-tower does everything the volcano does and than some. All of the parts are top quality and it appears to be engineered very well. Top this off with a price tag of about half of the volcano's and the V-tower just keeps looking better and better. I'm glad someone has stepped there game up and is trying to make a product to meet people in the middle of the road who want to buy a vaporizer.

    Check out this Video Review of the Extreme Vaporizer


    V-Tower Extreme Vaporizer for $299
    Read more...