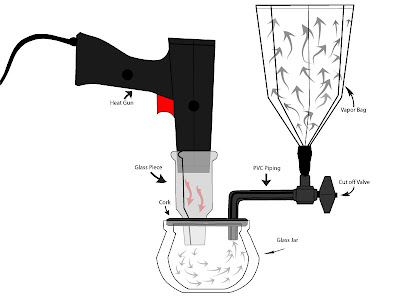
The toughest part of making a homemade vaporizer is tracking down the parts. I have spent many hours in an attempt to compile a list of everything required and link to find the stuff but it is difficult to find everything. For now you can see the picture I had made of the homemade vaporizer and improvise the best you can.
Now your first step is to pick up the supplies I have listed. Here is where you might have to improvise. For example you don't have to have a glass jar that is exactly round like the one in the picture.

My hope is you will understand the general concept of the design and be able to put your own spin on it. This homemade vaporizer design requires very little assembly. Once you have gathered the materials I have listed than you are approximately 90% done.
The hardest thing to find in this equation is the glass jar or bowl. The first homemade vaporizer that I encountered had a huge fishbowl-like glass jar with a cork fitting on the top. It was absolutely perfect. There was a straight glass tube that belled in the middle fitted perfectly for the heat gun.
Luckily the owner of the vaporizer knew a glass blower but you might not be so fortunate. It would be nice to find a glass blower for this but this is not always possible so I have figured out an easier and cheaper alternative. You can use a vaporizer bowl attachment instead, and make sure you get the one with the long stem.
The Homemade Vaporizer Supplies
Ok...if you have all the stuff the rough part is over and you are ready to get this homemade vaporizer going. You need to put two holes in the cork lid about 2 inches apart. One will be for the glass tube or vaporizer bowl and the other for the PVC 90 degree elbow.
When making the homemade vaporizer keep in mind that it must be air tight, so only make your holes as big as the circumference of the bowl and fitting. If you happen to make the holes too big don't panic, because you can wrap some duct tape around the pieces to make them fit nice and snug.

Now we need to make sure the on/off valve fits tightly also, and is able to be connected and disconnected with ease for your vaporizer sessions. You can get creative and set this up however you would like as long as you know it needs to remain open while filling and open/close for operation.
The last step is to attach the bag with duct tape or a hose clamp and you are good to go.
Congratulations, it's time to test your homemade vaporizer
Let the Testing Begin!!!


